
Makeup application can look and seem easy, but sometimes, even professionals like me have an off day. We either panic, leave it, start again, or just give up. But the good news is, there is always a solution and most being easier than you think too.
The good thing about makeup in today’s world is that application is not as placed. Products are blended and moulded into skin and over each other, often smudged and quite raw looking, giving it that lived-in look. This is great if a blunder occurs on the eyes especially, as it can usually be blended in to make a fabulous new version of the look you were going for. Skin can be less forgiving, but if you know your tones, anything is fixable.
Here are some of the most common blunders; with some easy fix it tips to get you on your way.
Complexion
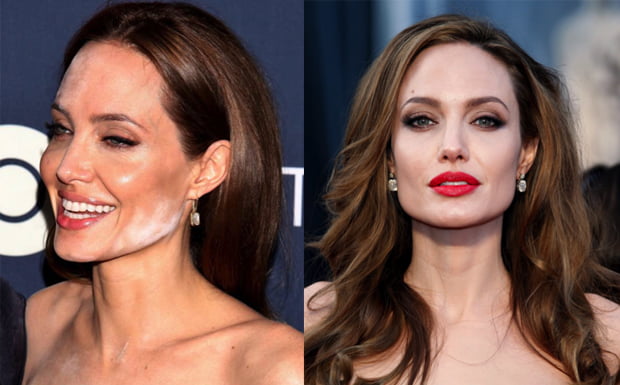
Complexion, in general, can be the first area where we look for visible signs of makeup. It seems more acceptable for someone to have a little smudge or crease line showing on the eyes. But a visible foundation line, or incorrect colour choice is much less forgiving. It was obviously done at application point, so there is really no excuse. Make sure you always match your skin tone correctly, not on the back of hand, but where we are actually applying it to guarantee a perfect colour blend result. Make sure that if you’re using a foundation/powder/concealer product for the first time, take a quick selfie before leaving the house, one with flash and one without and you will know pretty soon if anything needs a little fix.
Foundation Looking Dark or Muddy
Often we upgrade our foundation in summer to a warmer option because of our new glowing, tanned skin. This is fine for those three months or so that we have the tan, but can play havoc during the cooler months when we lose the colour. My advice is to always have two foundation shades on the go. It is rare to find someone with the same skin colour all over and in some areas, you may need a slightly darker shade like covering pigmentation, as it needs the depth to look even. It’s also a great idea to have two shades handy, so when you do loose your summer glow, you can mix the shades together. As a makeup artist it’s what I do daily with my clients, I very rarely use one shade all over the face. If you’re thinking, two shades of foundation? No thanks or too hard, you can try a light concealer/highlighter and if you don’t have one, you should definitely invest.
Every makeup I do, I use a skin tone highlighter in non-metallic, to lift the areas we want to add light to – above cheekbones, centre of face (between brows and chin) – this brings forward the highlight points of the face to give structure, the first part of contouring. If you realise that your foundation, or perhaps you have over-bronzed your face, just bring a highlighter to these areas and then you have managed to save your look, giving a new structure of light and shade.
Concealer Looking Too Light Under The Eyes
This is probably the most common mistake I see or get asked about. We see so many celebrity images and think: how are they so fresh and light under the eyes? I want that look. So, we go out and buy a light shade of concealer and think that will be the solution. A dark circle usually has a blue-purple hue to the area so using a light shade of concealer is just going to highlight, and draw attention to the area, making it appear grey. The trick is, you always need to correct, before adding highlight. So, by using two shades of concealer – just like a celebrity makeup artist would – you will look super fresh, correct the problem, then lift it by freshening the area.
Always buy a yellow to orange base concealer for dark circles, only applying it on the dark circle and not all over the eye. The deeper the dark circle, the deeper the yellow/orange shade should be, as it will cancel out the blue tone, making it ready to brighten. Yes, our concealer doesn’t need to match our skin tone, as our skin tone doesn’t have a blue/purple tone present, and if it did, you would need to go deeper in shade to correct it. Once this corrective application has been made, then the celebrity magic comes from applying a slightly lighter shade over the top. This brightens, freshens and works because the undertone has been corrected and balanced. Never throw out that light shade ‘mistake purchase’ concealer, as when you have the corrective shade, they work together as a duo.
Eyes
The eyes for me, personally, can be a little easier to fix. A smokey, smudged approach to shadows and liners are very on trend, as we still want a polished look but not a washed up version of ourselves. I use a foundation brush for blending with eye shadow, more for under the eyes, sides and edges as it can create a beautifully clean line/blend when we have gone a little too far with our shading. Fingertips and cotton buds smudge more, or remove the product, whereas the foundation blends and cleans the area.
The Eyeliner Droop
We love eyeliner, but they can be fiddly. The problem is, not all eyes are the same in bone structure, so what looks good on someone else, may not necessarily suit your own eyes. If you know your eyes are a bit tricky, or you are not as confident, don’t use a liquid liner – it could be a recipe for disaster. Rather, use a soft kohl style eyeliner, apply it to top lash line and with a little brush, smudge it in and upwards through the eyelid. This is a fool-proof, any eye, any age application that suits everyone, as it gives a quick smokey eye.
If liquid liner is your thing, but it seems to droop or dip once your eyes are open, the trick is to try measuring where your liner will finish, with the eyes open. When the eyes are open, this shows skin placement that might not be visible when the eye is closed as skin is more taught.
‘How To’
Place a pencil/brush from the outer edge of your nostril, diagonally upwards in line with the outer edge of your eye. This is the eye makeup finish line, for liner and shadow, anything placed after that will make the eye droop and ultimately have no lift. With that line in mind and the eyes open, stencil out your finish line and apply as much of that finish line with your eyes open, so it is always perfectly placed and thus, eliminating the droop. Now you can finish your liner as normal once your eye is closed.
MB PRO TIP;
This outer finish line can also be used for eye shadow – know the finish line to avoid a droopy eye shadow, apply outer eye to inner so this does not happen. Applying inner to outer means you may follow the natural flow of brow/socket bone, all the way to the outer eye and go lower than this line.
Over Plucked Brows
We have all been there, one to five brow hairs too many and it’s a whole new brow shape – one that can make us feel very surprised and exposed. Enter brow powder.
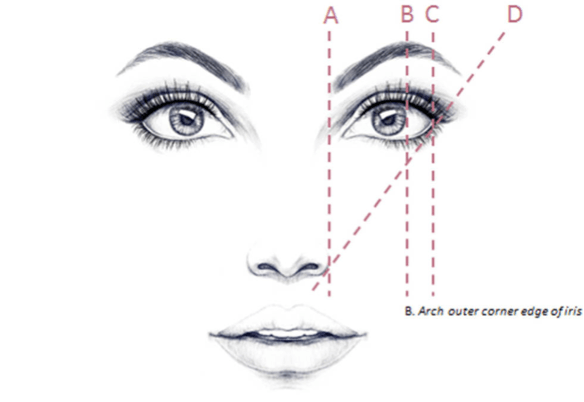
If you know the correct brow measurements and where each point – start, peak, finish – are meant to be, it’s an easy fix. The ‘D’ line is the finish line I was talking about above, for avoiding droopy eye shadow/eyeliner – it’s a great help for end of brow points as well. I like to use a small angled brush, and place a vertical line at start point of brow. From there, use horizontal, feathered strokes, mimicking real hairs and apply along the top part of brow, almost drawing on the skin from line ‘A’ to ‘B’. Once my peak is there at line ‘B’, I then feather diagonally, still slightly above the natural brow line from ‘C’ to finish at ‘D’. At this point, we have added density to the brow, by filling the upper parts of the brow. Then with a brow brush, brush the brow hairs up and over this application and you have new, full brows. The colour becomes a shadow underneath the brushed up brow hairs for a seamless result. Brushing the brow hairs upwards, also gives instant lift, whilst brushing sideways or down can create as droop. The trick to adding brow makeup is to not go too dark; we want brow density, not darker brows.
Lips
Most of us want fuller lips and a more plump pout. Choosing the correct shade and understanding highlight and shade is key to achieving the lip look you are after. Remember this: darker matte shades equal smaller lips, whilst brighter, glossy shades equal fuller lips.
Lips Look Smaller After Lipstick Application
If you look in the mirror after applying your lipstick and your lips look deceivingly small, you may have made the mistake of applying a lip pencil or lipstick a little too deep for your lip to handle. Rather than take the whole shade off and start again, add some light to the area for a saving pout. When a dark solid matte shade is applied to the lip, it can look flat and attract no light to give a plump effect. By just dabbing a lighter shade on the centre part of the mouth – glossy would work best – this can add some light to a dull looking shade to bring life and reflection back. Also, by adding a highlighter, something light reflecting on the top peaks (cupids bow) of the lip – almost tracing the outer edges – you’ve instantly drawn attention to the area by adding light, giving you a fuller more delicious pout.
Light plays a big part in making things look a little fuller, so have a play by mixing two shades – lighter in the centre whilst deeper on the outer is a lip winner. Now, all of these tips are great, but a big part of it comes down to lighting. Some bedroom and bathroom lights can be quite warm and dull so remember to make sure you check your makeup in other lighting before leaving the house. Remember: natural is always best, so face a window for the final makeup check and you are good to go.
Photocredit: Perez Hilton and Picguru.info


