
Eyebrows have become such a staple makeup trend in the past few years. A pop lip, lash and brow have become accessories to ‘skin’ makeup, the hero of any look.
We are all after quick anti-ageing makeup techniques and with the right highlight and shade used on the correct areas, this is easily achieved.
But, the eyebrows can in fact be such an anti-ageing tool – they can lift and with the correct thickness, cut in half the upper eye area to avoid any heaviness on the overall eye area.
Thicker eyebrows have been on trend for a while now. Fresh, full, brushed up is key for the ‘now’ brow, but it’s the brow thickness and shape that can make the difference and lift the face for the perfect frame.
Before anything else, it is important to know the correct shaping measurements of the brow. The start, arch point and finish are vital for brow perfection, suiting your face – do not just copy a brow you see or like, as it might not fir your own face shape.
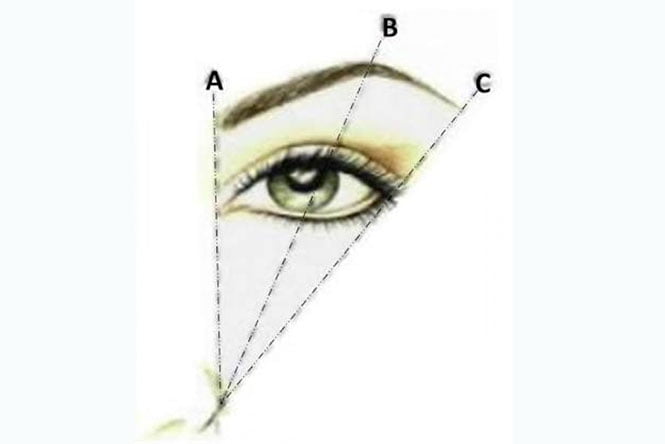
By placing a pencil or makeup brush on these start and finish points from the side of the nose will guarantee your brow shape is one that is suited with your bone structure.
Points to Remember with Brow Shape;
FACE SHAPE
Your face shape can also be an identifier for what brow look you should go for…
We normally go the opposite of our face shape to avoid over-pronouncing the shape we had.
*Oval or Round face shapes should avoid an overly round eyebrow – this will just widen the face shape and make the face loo more round.
*Square or Rectangle face shapes should have a softer brow arch and not so angular, otherwise it can be too harsh, or squash in the face rather than be a softer elongation.
Opposites attract in so many areas of makeup application with shade choices for example, and in face shape to brow shape, it works exactly the same.
INSTANT LIFT
Even if you have no time for anything else, a simple brush of the brow, which takes less than 30secs, can do wonders.
A lot of us brush our brows out to the side, or follow the downward outer curve of the brow… This means our face shape can follow that outer, downward look – not good, especially if our eyelids are already on the heavy side with puffiness.
Always brush your eyebrow hairs upwards and outwards, so they have a lifting effect. It is amazing that when you try one brushed up and the other brushed out and down, the lifting effect on the brushed up brow is very obvious.
Instant, fresh and simple – we love that, especially in the upcoming warmer months.
I sometimes even spray a teeny amount of hairspray on my eyebrow brush, or old toothbrush, just so the upward look stays put on the eyebrow hairs.
BROW DENSITY
Brow density = brow fullness, not colouring it in with makeup to make the brow fuller. One solid colour is the worst look on a brow and makes everything look too placed and drawn in.
Most of us have enough main brow hair from centre to half way of the brow, it is the upper and outer areas that usually need a bit of help when it comes to brow makeup.
If we spend time adding a brow powder/pencil to the start, centre and lower brow line, it can look over full, too much colour and lower the brow, as it is heavy looking. We want lift, lift, lift, so less colour applied in the lower and centre areas, the more lift we can create.
The perfect application technique is small, light, feathered strokes – rather than one continuous line. No harshness is needed.
I usually use a little flick of the wrist and a feathered look (real like hair approach) is created.
HOW TO:
Step 1 – Using the brow-measuring chart as a guide, start with a light vertical line at the start of brow… Apply a little higher than natural brow point.
Step 2 – Continue to feather brow colour horizontally across the very top of our natural brow line, almost drawing on the skin. This may look drawn on at first, but following steps minimize this.
MB PRO TIP – We want to add density at the top of the brow to create fullness, but higher in the brow to give a lifted eye effect. Applying lower, or in the brow hairs will lower and flatten eye shape.
Step 3 – When you reach the brow peak, change angle and apply colour diagonally to outer stop point (follow brow chart for this point).
Step 4 – Now that brow has been lifted and colour added, it is all in the brow brush. When brow hairs are brushed upward, the hairs then cover the placed colour and it creates a beautifully natural upward lifting, full brow.
BROW COLOUR
As our main goal is to add density, not colour to the brow, we shouldn’t be using anything too dark for this technique.
The colour we use is almost a shadow effect to create this fullness, not a solid exact hair/brow colour.
90% of all my makeup application for brows I work on, I use a taupe shade…
A dark blonde, being flat, caramel, slate grey are all great – I very rarely use a brown or a black as they can be too obvious and harsh, changing the brow colour, not adding density.
Taupe is my favourite shade for a slight re-shape and lift, using the technique I described above.
I also get asked a lot, “When do I use a brow pencil and when a powder?”
Personally I prefer brow powders, used with a small, firm, angled brow brush – this adds density softly, where as pencils are more for high glamour and a little extra brow drama.
Brow powder can be so subtle and then buildable throughout the day, if you are wanting more from day to night, therefore easily brushed up.
So brows… Easy, lifted and a very big anti-ageing factor in my line of work… It really is a matching pop to your lip and lash in today’s makeup world.
Feature Image via Zimbio
Follow Michael Brown:
Website | Facebook | Twitter | Instagram


