
Just over a year ago, I underwent a hair restoration procedure and boy what a difference a little bit of hair can make.
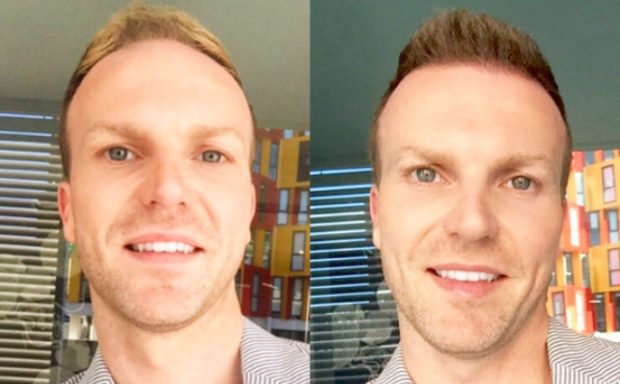 Left : Michael early 2015 | Right: Michael November 2015 (5 Months after procedure)
I guess looking back, I have always had a high forehead, especially if my hair was pulled all back; the ‘peaks’ were very obvious. But ever since my late 20’s I noticed my hair was thinning at the front.
At the time, I had this side sweep look going on, so I managed to make my hair look thicker with product and the general style.
For as long as I can remember though, I have tried to make the front of my hair appear thicker and fuller.
I’ve used every densifying shampoo product, dry clay to mattify my hair – rather than adding shine that can amplify the thinning look and I even dyed my hair lighter to avoid my scalp being more noticeable through my hair.
I was also on medication to assist in thickness and to keep the hair I had, longer. You can say I’ve done it all – I used to even swim with hats on, so you wouldn’t see balding areas when my hair was wet.
Creating thickness is one thing, but actually growing hair back hair seemed impossible.
The Process
Fast Forward to April 2015 and I met the amazing Dr Sara Kotai, founder of Man Cave in Sydney, where Hair restorations occur regularly through Martinick Hair, performed by Dr Sara herself and the infamous Dr Jenny Martinick.
I was informed that a hair transplant procedure had a high success rate and that a consultation was necessary to assess how much hair has been lost now, but also signs of future loss.
In my mind, it was the very obvious front section of my head that needed treating, but upon consultation, I was informed I was thinning through the very top of my head, working it’s way to the crown and that my temple area had also had hair loss. Who knew?
I guess we don’t really see our head from bird’s eye view and I didn’t notice my side/temple areas were also creeping back at all.
This meant, that if I only treated the very front section – to bring my hairline forward – my sides would be off balance. Then in years to come, I’ll have more visible loss through the very top of my head.
Biggest Tip:
You must think about potential future loss and what that would look like, otherwise you may have this amazing new hair at the front of your head, but later in life suffer from thinning, or next to no hair at the top and back.
It’s better to treat signs of future loss all in one procedure to avoid other balding patches appearing down the track.
After finding out that my donor area (the area at the back/sides of your head where follicles will be extracted) was in good form and able to have enough follicles transplanted, it was a yes from me.
My Concerns
With my particular case, I was to have 3000 skin grafts mainly at the front, sides and scattered through the middle of my head, with 4,500 follicles implanted.
These follicles have to come from somewhere and that somewhere meant the back of my head, where an incision needs to be made for extraction of the number of follicles needed.
As I needed 4,500, I knew it was a big incision, but to be honest, I just kept thinking how good the front of my head would look, I didn’t think too much about the possible scar that would be left long term.
This type of procedure is called FUT (Follicular Unit Transplantation), also known as the ‘Strip Method’ because the way the follicles are removed in a strip, from the donor area.
This method is the chosen one at Man Cave/Martinick Hair because of the very high survival rate of each follicle once transplanted.
Other methods like FUE (Follicular Unit Extraction) sound great at first, as there will be no visible scar after procedure. But the survival rate of follicles extracted are much less because of not being kept all together/grouped in a ‘strip’. Why go through all that, and not have a high percentage of follicles survive, all for the sake of a small scar?
I was warned that every procedure is completely different.
Some suffer some shock loss after procedure, some have a tight scalp, but there was nothing at all that scared me about the procedure, not even the incision and potential scar after. Because all I kept thinking of was the fact that no matter what happens, I’m going to have more hair than I have right now, so anything is a big win.
My Experience
To be honest, my experience was much easier and pain-free than I thought it would be. I wanted new hair so bad, that I would of done anything required, but was shocked at how simple and easy everything seemed.
The worst part was taking the before photos on the day of surgery. I had to wear a head band to really show how much loss I had on the top of my head, something which I had never seen before, as I had always pushed the hair I had forward, to cover any balding areas.
I felt extremely well briefed and was aware of everything (nearly 10 hours of it) that was about to happen.
My new hairline was drawn in with a marker, and I was ready to go!
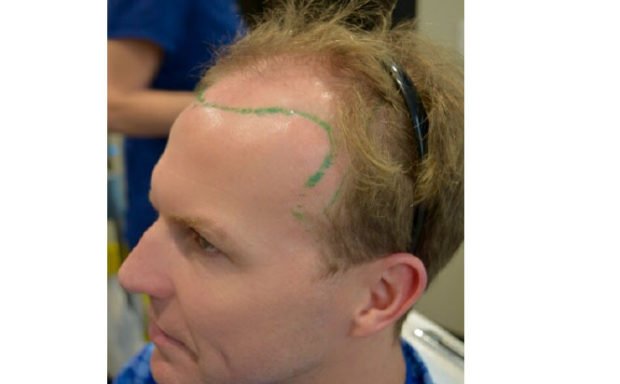 Michael day of procedure
While I never felt anything around the head area during the procedure, I was put into a ‘twilight’ stage. I drifted in and out of sleep through the procedure – chatting one minute, asleep the next, then up for lunch and then back to sleep.
At the end of the day, I was briefed on after care, had a goodie bag of some medication and products to use and actually felt pretty good considering the very long day I had. Even though my head didn’t look too pretty that night, I could see the new hairline created and was already doing selfies, checking out my new look!
The Results
I am someone – especially for something so personal, that I wanted so badly – that followed the after-care instructions perfectly.
In the weeks leading up to the procedure I massaged the back of my head daily, so after surgery, I wouldn’t have an extremely tight scalp.
I also slept on a 45 degree angle for a few nights after, so any fluid from the treated area would drain to the back of my head, which avoided puffiness in my facial area.
I took some painkillers, but not a huge amount and couldn’t wash my hair for the first week. When I was able too, I was prescribed Dettol Anti-bacterial hand wash and was super gentle for nearly a month.
Working for myself meant, I can’t really take a lot of time off and as it turned out, I was called in to do one of my Today Extra segments for Channel Nine 4 days after Surgery. I felt absolutely fine, but I had a trendy Fedora hat arranged for post surgery that became my best friend for various work and social commitments and didn’t need any time off as such.
I began to see a huge change in new growth around the 3-month mark, it was like I woke up one day and baby hairs were everywhere, it was such an amazing feeling.
Over the next few months, my hair got thicker. It was darker than ever because of such new, healthy, strong follicles and my face shape started to change as hair grew in areas it hadn’t for years and I have been on cloud 9 ever since.
 Top left: Day of procedure | Top Right: 2 weeks after procedure
Bottom Left: 3 months after procedure | Bottom Right: 7 Months after procedure
Hardest Moment
It’s so exciting seeing all the newly transplanted little hairs sitting in their new positions for the first couple of weeks post surgery. But then, you are forced to massage them out as the body rejects them, thinking they are a foreign object. Seeing hairs, then seeing them fall out was painful, but I also took it as, the sooner they go, the sooner I’ll see new ones grow.
Best Moment
I now get to talk about my experience and I have been very open about the procedure to help other guys who may have the same balding issues as I did, which can cause so much anxiety and low self esteem.
Men don’t really talk about anything vanity related, but hair (or lack there of) can change someone’s appearance and confidence levels dramatically.
All the money some guys spend on lotions and potions and in one day, my life changed forever, I had new hair, my own hair growing in the correct areas. Its been such an amazing experience and feel like more guys need to know about this success story.
 Michael 1 year after procedure
Follow Michael Brown: Website | Facebook | Twitter | Instagram


